As of June 10th, 2026 a new version of RenoDX has released in the RenoDX server’s Cyberpunk 2077 channel. Anything below this is considered to be outdated, but may still be of use. Please use your own discretion when adjusting settings and picking which mods to use alongside RenoDX.
There is no ETA for when this guide will be updated.
AS OF MAY 30TH, 2026, I AM NO LONGER SUPPORTING THE CREEPY ULTRA HDR PRESET, DUE TO ME STARTING A NEW JOB. I HAVE NO IDEA HOW THE PRESET LOOKS WITH THE LATEST RENODX. IT MAY WORK, IT MAY NOT. PLEASE DO NOT PING ME OVER THIS. NO SUPPORT MEANS NO SUPPORT.
If you are using DLSS Ray Reconstruction (aka Nvidia users) then I highly recommend using Preset D. This will have much less banding issues, especially in the sky, compared to the newer Preset E. Preset D is what the game uses by default. You can set this via the Nvidia App DLSS Override feature (Graphics > Program Settings > Cyberpunk 2077 > Driver Settings) or a third party program such as DLSS Swapper.
Ray Reconstruction is highly recommended to be used in Cyberpunk when path tracing is enabled, otherwise you’ll notice quite a bit of specular artifacts known as noise. AMD / Intel users can make use of the NRD mode found within the Ultra Plus mod as another denoiser option.
Ray Reconstruction gets disabled when using the game’s photomode. This is a bug in the vanilla game and is not mod related. If you like to use the game’s photomode, then set the DLSS SR preset to M for better quality.
If you are upgrading from Version 1.0 or 2.0 of Creepy’s ReShade preset, then you just need to rerun the ReShade Installer, pick Update ReShade and Effects, pick the new preset, and it will grab the new shaders you need. It still uses the same GitHub shaders you downloaded before.
You also want to make sure that your RenoDX version is up-to-date. As of May 7th you still need to grab it from the RenoDX Discord server, check for the pinned post from April 5th, 2026.
Make sure your display actually supports HDR before installing RenoDX. Your monitor should be rated for HDR400 or higher, meaning it should have at least 400 nits peak brightness.
This is not to be confused with TB400 or higher.
TB stands for True Black. True Black rated monitors will have a separate True Black mode with a more limited peak brightness, but it should result in better looking black levels and shadows. The downside to using True Black mode is a lower peak brightness, thus the highlights won’t be as bright. Both True Black and the normal modes should look fine, so try both and see which you like better.
Try checking your display manufacturer’s website for the peak brightness, or you can check the AVS forums: https://www.avsforum.com/ When in doubt try searching for the model number in your favorite search engine.
Run the Windows HDR Calibration app to figure out your display’s clipping point. In theory this should be the same as the peak brightness of your display, but it’s sometimes lower. The clipping point will act as our peak brightness within RenoDX.
Grab the most recent PINNED version of the RenoDX mod from the RenoDX server. Look for the pinned post in the Cyberpunk channel. The GitHub and Nexus versions are both outdated; disregard the snapshot date on the GitHub page, it’s not accurate. This is still accurate as of May 7th 2026.
RenoDX server invite: https://discord.gg/jz6ujVpgFB
Direct link to the RenoDX Cyberpunk 2077 thread: https://discord.com/channels/1408098019194310818/1434377434022809610/1490559043343876196
How to manually find the Cyberpunk channel:

What is Wrong with Cyberpunk’s HDR?
This is the answer provided directly from ShortFuse, the creator of RenoDX:
- SDR uses LUTs that clip, they don't properly roll off. But they're all baked with ACES. So they're graded, with ACES per channel coloring, and their color tuning.
- For HDR, they took the SDR LUT, and as they were stretched them to 1900 nits. If the SDR LUT went to 100 nits, then it stretched them to 1900. If the SDR LUTs went to 325 nits (clipping over 100 nits), they were also stretched to 1900 nits. So they have inconsistent stretching.
- Then, after taking their ACES-baked SDR LUTs stretched to 1900 nits, they apply their custom ACES HDR to apply a second round of ACES to try to tonemap it down to user selected peak. Except they didn't.
- First of all, a LUT that only goes to 1900 nits would never hit peak, because that's not how you're supposed to use ACES. It's supposed to be the render. They're supposed to do Render => ACES-HDR. They did Render => ACESSDR-LUT-Stretched-to-1900-nits => CustomStretchedACESHDR.
- And they still overshot user peak by about 10%. And their custom ACES would scale and stretch based on what you put. The more peak nits your put, the more it did per channel stretching, meaning overcoloring things.
- It's basically nonsense and had no metric of sanity. The original RenoDX fix I did was to at least fix the stretching from their custom ACES HDR. I redid the CP2077 mod, and the one that's in the Discord targets the SDR look, fully knowing their HDR LUT is just cooked, ITM ACES-SDR.
MY OTHER CYBERPUNK 2077 GUIDES
- RENODX INSTALLATION GUIDE - Doesn’t include preset installation or personal setting recommendations.
- HOW TO FIND THE PERFECT LUT TO USE WITH RENODX
- RECOMMENDED CYBERPUNK MODS
A TROUBLESHOOTING SECTION IS PROVIDED AT THE END OF THE GUIDE
- This lists commonly asked questions and issues with possible solutions.
- A list of crash log locations is also provided.
How to Fix Cyberpunk’s HDR using RenoDX
If you haven’t done the Windows HDR Calibration, please do so now before continuing with the guide. Full instructions can be found here: Windows HDR Calibration.
PART 1: INSTALLING RESHADE AND RENODX
- Note about mod managers: While you technically can install ReShade by placing the files within Mod Organizer or Vortex, this isn’t something I’m going to cover. However the preset(s) are offered as a mod manager compatible download as of version 2.
- This guide also does not cover using Special K with ReShade, Display Commander, or using Optiscaler.
0) Install Cyberpunk 2077. Make sure you’re using the latest version of the game, 2.31.
1) Download Creepy’s HDR Gameplay V2-1 preset from Nexus Mods: https://www.nexusmods.com/cyberpunk2077/mods/28191.
- If you download via a mod manager this will automatically get placed in the
\bin\x64folder while in-game. If you manually download the preset I also recommend placing the preset file(s) in this location to make them easier to find. - Older versions of the preset are not supported.
2) Download the LATEST version of ReShade WITH FULL ADD-ON SUPPORT from https://reshade.me/#download
- When running the ReShade installer, make sure to not run it directly from the Windows Downloads folder or the Cyberpunk 2077 install folder, because both options can cause issues. At the very least make a new folder in Downloads or the Desktop and place the ReShade installer there.
The latest ReShade version as of writing this guide is 6.7.3

3) Install ReShade to Cyberpunk2077.exe that is located in \bin\x64 folder (which the installer should default to once you pick Cyberpunk 2077). Click Next.
ReShade: Select Game or Application

4) For the rendering API pick DirectX 10/11/12, as the game is DirectX 12. Click Next.
ReShade: Choose the Rendering API

5) Select Update ReShade and effects if updating ReShade.
- If installing ReShade for the first time you’ll already be at the effect (shader) selection screen.
6) Click the Browse... button toward the bottom and pick the Creepy HDR Gameplay V2-1 preset you downloaded earlier. Click Next.
- This will automatically pick: Deband, Zenteon’s Local Contrast, Zenteon’s Sharpen, Pumbo’s AdvancedAutoHDR, and Lilium’s HDR Analysis shaders.
- I do not recommending clicking
Check Allbutton and picking all of the shaders. This will just lead to longer compile times when you start the game. - You’ll still need to download a few shaders from GitHub that aren’t listed within the ReShade Installer.
7) Click Skip on the add-on selection screen.
- You do not want to pick any addons for normal gameplay use. Unneeded addons will just cause issues or may even prevent the game from starting.
8) Click Finish.
- Do not start the game until the remaining shaders are downloaded and placed within the reshade-shaders folder! Failing to adhere to this warning will result in missing shaders, and the preset won’t look as intended.
9) Download Remaining Shaders from GitHub:
- On each GitHub page click the gree
Codebutton, then click Download ZIP.
- Azen PreCorrect: https://github.com/Zenteon/Azen/tree/main. You need both the shaders and textures folders, downloading the Zip file as mentioned above will grab both automatically.
- ShortFuse’s Film Grain: https://github.com/clshortfuse/reshade-shaders/tree/main.
10) Extract the contents of the ZIP folders to the reshade-shaders folder located in the /bin/x64 folder within the Cyberpunk 2077 installation.
11) Grab the RenoDX addon from RenoDX Discord server. Look in the pinned comments of the Cyberpunk 2077 channel.
- You can also find the MapLUTBegone mod pinned here as well. This helps fix an issue with the world map that is an unfortunate side effect of using RenoDX. Click here for more info.
Click for RenoDX server info and screenshots of the Cyberpunk 2077 addon location.
- The GitHub and Nexus Mods versions of Cyberpunk's RenoDX are outdated as mentioned in the bubble at the top of this guide. The version pinned in the comments has the new fancy PsychoV tone mapper, which makes colors look a lot more accurate and neon lights should look a lot better.
- RenoDX server invite: https://discord.gg/jz6ujVpgFB
- Direct link to the RenoDX Cyberpunk 2077 thread: Cyberpunk 2077 Thread
Cyberpunk 2077 addon pinned in the Cyberpunk 2077 thread:

12) Place the RenoDX addon renodx-cp2077.addon64 in the \bin\x64 folder where Cyberpunk 2077 is installed. If you previously installed the WIP version of RenoDX, renodx-cp2077-wip.addon64, then delete it.

IF YOU HAVEN’T DONE THE WINDOWS HDR CALIBRATION, PLEASE DO SO NOW BEFORE CONTINUING WITH THE GUIDE!
- Full instructions can be found here: Windows HDR Calibration.
Clipping Point vs Peak Brightness
- Anything above this value can't be seen with the naked eye.
- Theoretically this should be the same value as the peak brightness, but that's not always the case. Some displays have a higher peak brightness with a lower clipping point.
REMEMBER: PEAK BRIGHTNESS = CLIPPING POINT
This is your peak brightness for now on when it comes to RenoDX, and any other HDR mod, shader, or application.
- After you run it once for each mode, you can then switch the HDR profile within the Windows Display settings whenever you switch to the corresponding display mode.
- This does not apply when switching from HGIG to Dynamic Tone Mapping mode. You should always calibrate in HGIG mode if your display has that capability. You would then use that same value even in Dynamic Tone Mapping mode.
13) Start the game. Open the Settings menu.
14) Go to Video > HDR settings. Make sure Cyberpunk’s HDR is turned ON and set to HDR10 PQ mode. The HDR10 scRGB mode will not work with this preset.
-
If you have an
HDR10+ Gamingsetting, make sure it is disabled because it can cause crushed black levels. You’ll see this underneath the HDR Mode selection. This will only appear if your computer detects that you are using an HDR10+ compatible display. -
Maximum Brightness: Leave at the default value. This setting is ignored when using RenoDX. This gets replaced with the
Peak Brightnesssetting in the RenoDX addon. But you can set it to your peak brightness if it makes you feel more comfortable. -
Paper White: (UI Brightness) 200 or change as desired. This setting has no other effect when RenoDX is installed.
While some RenoDX mods have a dedicated UI slider, the Cyberpunk one does not. However, the actual paper white setting, in terms of what you’re probably used to with HDR settings (aka the average brightness), is called Game Brightness in the RenoDX addon.
-
Set Tone-Mapping Midpoint to 1. Tone-Mapping Midpoint is critical for the overall brightness of the game. If the game is too bright then doublecheck this setting. This is a poor attempt at an exposure slider, and shouldn’t be adjusted when using RenoDX. Use RenoDX’s exposure slider for better results.
-
Make sure HDR10 PQ saturation is 0!!! This will cause issues with Frame Generation if changed. Just use the Saturation slider within RenoDX instead.
HDR10 PQ Saturation absolutely, 100% without a doubt, needs to be 0!
DO NOT CHANGE THIS SETTING!!!
Non zero values will cause issues with frame generation when moving. If you want to increase the game saturation, use the saturation slider within RenoDX.
HDR settings
Ignore the Maximum Brightness setting.
15) Within Cyberpunk’s Graphics settings, make sure Color Precision is set to High or it will result in a washed out / gray image.
Color precision setting

16) Open the ReShade interface, default button is the Home key.
- If you don’t have a Home key please refer to this guide that goes over how to change it to a different key: https://www.youtube.com/watch?v=xoCdpOIRKus
PART 2: RENODX SETTINGS
- Click on the
RenoDXtab along the top of the ReShade UI.
Recommend adjusting color grading sliders when using Lilium’s HDR Analyis tool shader.
It’s normal for the peak brightness to slightly exceed what you set it too and going over by like 50 nits isn’t usually a big deal, especially if using film grain.
Be very careful with the exposure, contrast, highlights, and cone response sliders. If you notice that your peak brightness is really high, check these first.
You should not need the Black Floor Fix shader with RenoDX! If you feel like you need to use it then there is probably something wrong with your HDR settings.
If a value isn’t listed, then that means the preset was made with the default value in mind, but you can adjust each to your liking. If you’re using a LUT that looks a lot different from the vanilla / default LUT, then further tweaking may need to be done.
Tone Mapping
Tone Mapper: PsychoV-17. This has better color accuracy and neon lights will look much better compared to the other tone mapper versions. The other tone mapper options are not supported in this guide.
- If you do not see PsychoV-17 as an option: - Still accurate as of May 3rd, 2026.
- RenoDRT: older tone mapper. This will appear as the furthest right option if you download it from GitHub or Nexus Mods, either are going to be older than the Discord pinned versions. Do not recommend using as any of the PsychoV LUTs will look much better.
- PsychoV-11: older version that was pinned in the RenoDX server’s Cyberpunk thread. Looks nice but the blue and purples will look better with PsychoV-17. Lacks the
Cone Responseadjustment. - PsychoV-XX: If the XX number is higher than 17 that means a newer version of RenoDX has come out after this guide was last edited.
- Aces: AVOID
- Vanilla: AVOID
Peak Brightness: Set the Peak Brightness to match the results from the Windows HDR Calibration test you did earlier.
Game Brightness: The paper white value, also known as average brightnes. You typically want to set this between 100-300 nits.
- Setting this too low will make the game appear to be too dark and vice versa.
SDR EOTF Emulation: also known as gamma correction. UI/Menu Only is recommended for most use cases, as having it set to On can be too dark in some situations. If you’re going to change this I recommend picking a dark room in the middle of the night so you can use that as a reference point.
Hue Correction: None.
Color Grading
Exposure: One of the major settings that affects the overall brightness / darkness of the game.
Highlights: Adjusts the intensity of the brightest elements on the screen. Can easily exceed peak brightness if increased too much. If you can’t see highlight details anymore then this may be too high.
Shadows: Adjusts the intensity of the darkest elements in the game. If you can’t see details in the shadows then this may be too high. If you want darker interiors / nights, recommend using the Nova City 2 mod instead.
Contrast: Controls the visual difference between the brightest and darkest tones in the game.
- This setting is particularly sensitive in this game and can easily make you exceed your peak nits if pushed to an extreme setting.
Saturation: Adjusts the color intensity of the game. Reduce to 0 to make the game appear to be in black and white.
Cone Response: 70. This is equivalent to how the Cyberpunk developers intended the game to look.
- Only available when using PsychoV-17.
- Controls both Saturation and Contrast.
- This should be the first color grading slider you should adjust when trying to fine-tune the look when using PsychoV-17.
Highlight Saturation: Controls the intensity of the highlight colors.
Blowout: Set to 0.
Flare: Grayed out when using PsychoV.
White Point: Adjusts the color temperature.
LUT Strength: 50-60 for most LUTs including the default / Vanilla LUTs. 100 only if using Nova LUT 4.
- Nova LUT 4 at 100 strength. I personally tested this LUT for CyanideX, so I can confirm that it is the best LUT there is currently for RenoDX. The base LUT is equivalent to 5600K color temperature. The main file replaces the base game LUT so do not pick any LUTs within LUT Switcher when using it. With the LUT Switcher pack you can pick from 8 different color temperatures.
- You can technically use the default / vanilla LUT if you don’t want to use a LUT mod.
- RealcolorrIV can work at 50 strength and if you lower the saturation a bit, but it’s really meant to be used without RenoDX (which I obviously don’t recommend).
- I no longer recommend Preem LUT 3 as its too bright even at 50 strength.
Effects
Dynamic Exposure: Leave at 0. If this setting does anything that means the tone-mapping midpoint wasn’t set to 1.0 within the game’s HDR settings.
Bloom: Lighting effect that scatters light and creates a soft glow around highlights. If your game is too bright this is one of the settings you should check.
Vignette: Darkens the edges of the screen.
Film Grain Type: Perceptual. This Film grain does not affect black levels, which is a major benefit of using it. You must have film grain enabled within the game settings for this to work.
- The game’s vanilla film grain is broken currently so there is zero reason to use that setting. The vanilla option can also cause artifacts to appear in parts of the HUD.
Film Grain Strength: set to 0 when using my preset.
- You’ll use a film grain shader instead, which is included in my preset, because we want film grain to be the last thing that gets applied. If we used the RenoDX film grain then it would get applied before the preset and mess up the look of the other shaders.
Processing
LUT Scaling: Looks at the texture and scales the color based on the amount of dynamic range the LUT isn’t using. You might not notice a difference when adjusting this setting depending on the situtaion, because LUT scaling only does things if the LUT has compressed black/white levels. I personally don’t touch this setting and never felt the need to adjust it regardless of which LUT I’m using.
LUT Order: Only need to change this if using a LUT mod / LUT Switcher pack that doesn’t look right. Can adjust as needed. But otherwise leave this on Vanilla.
Debug
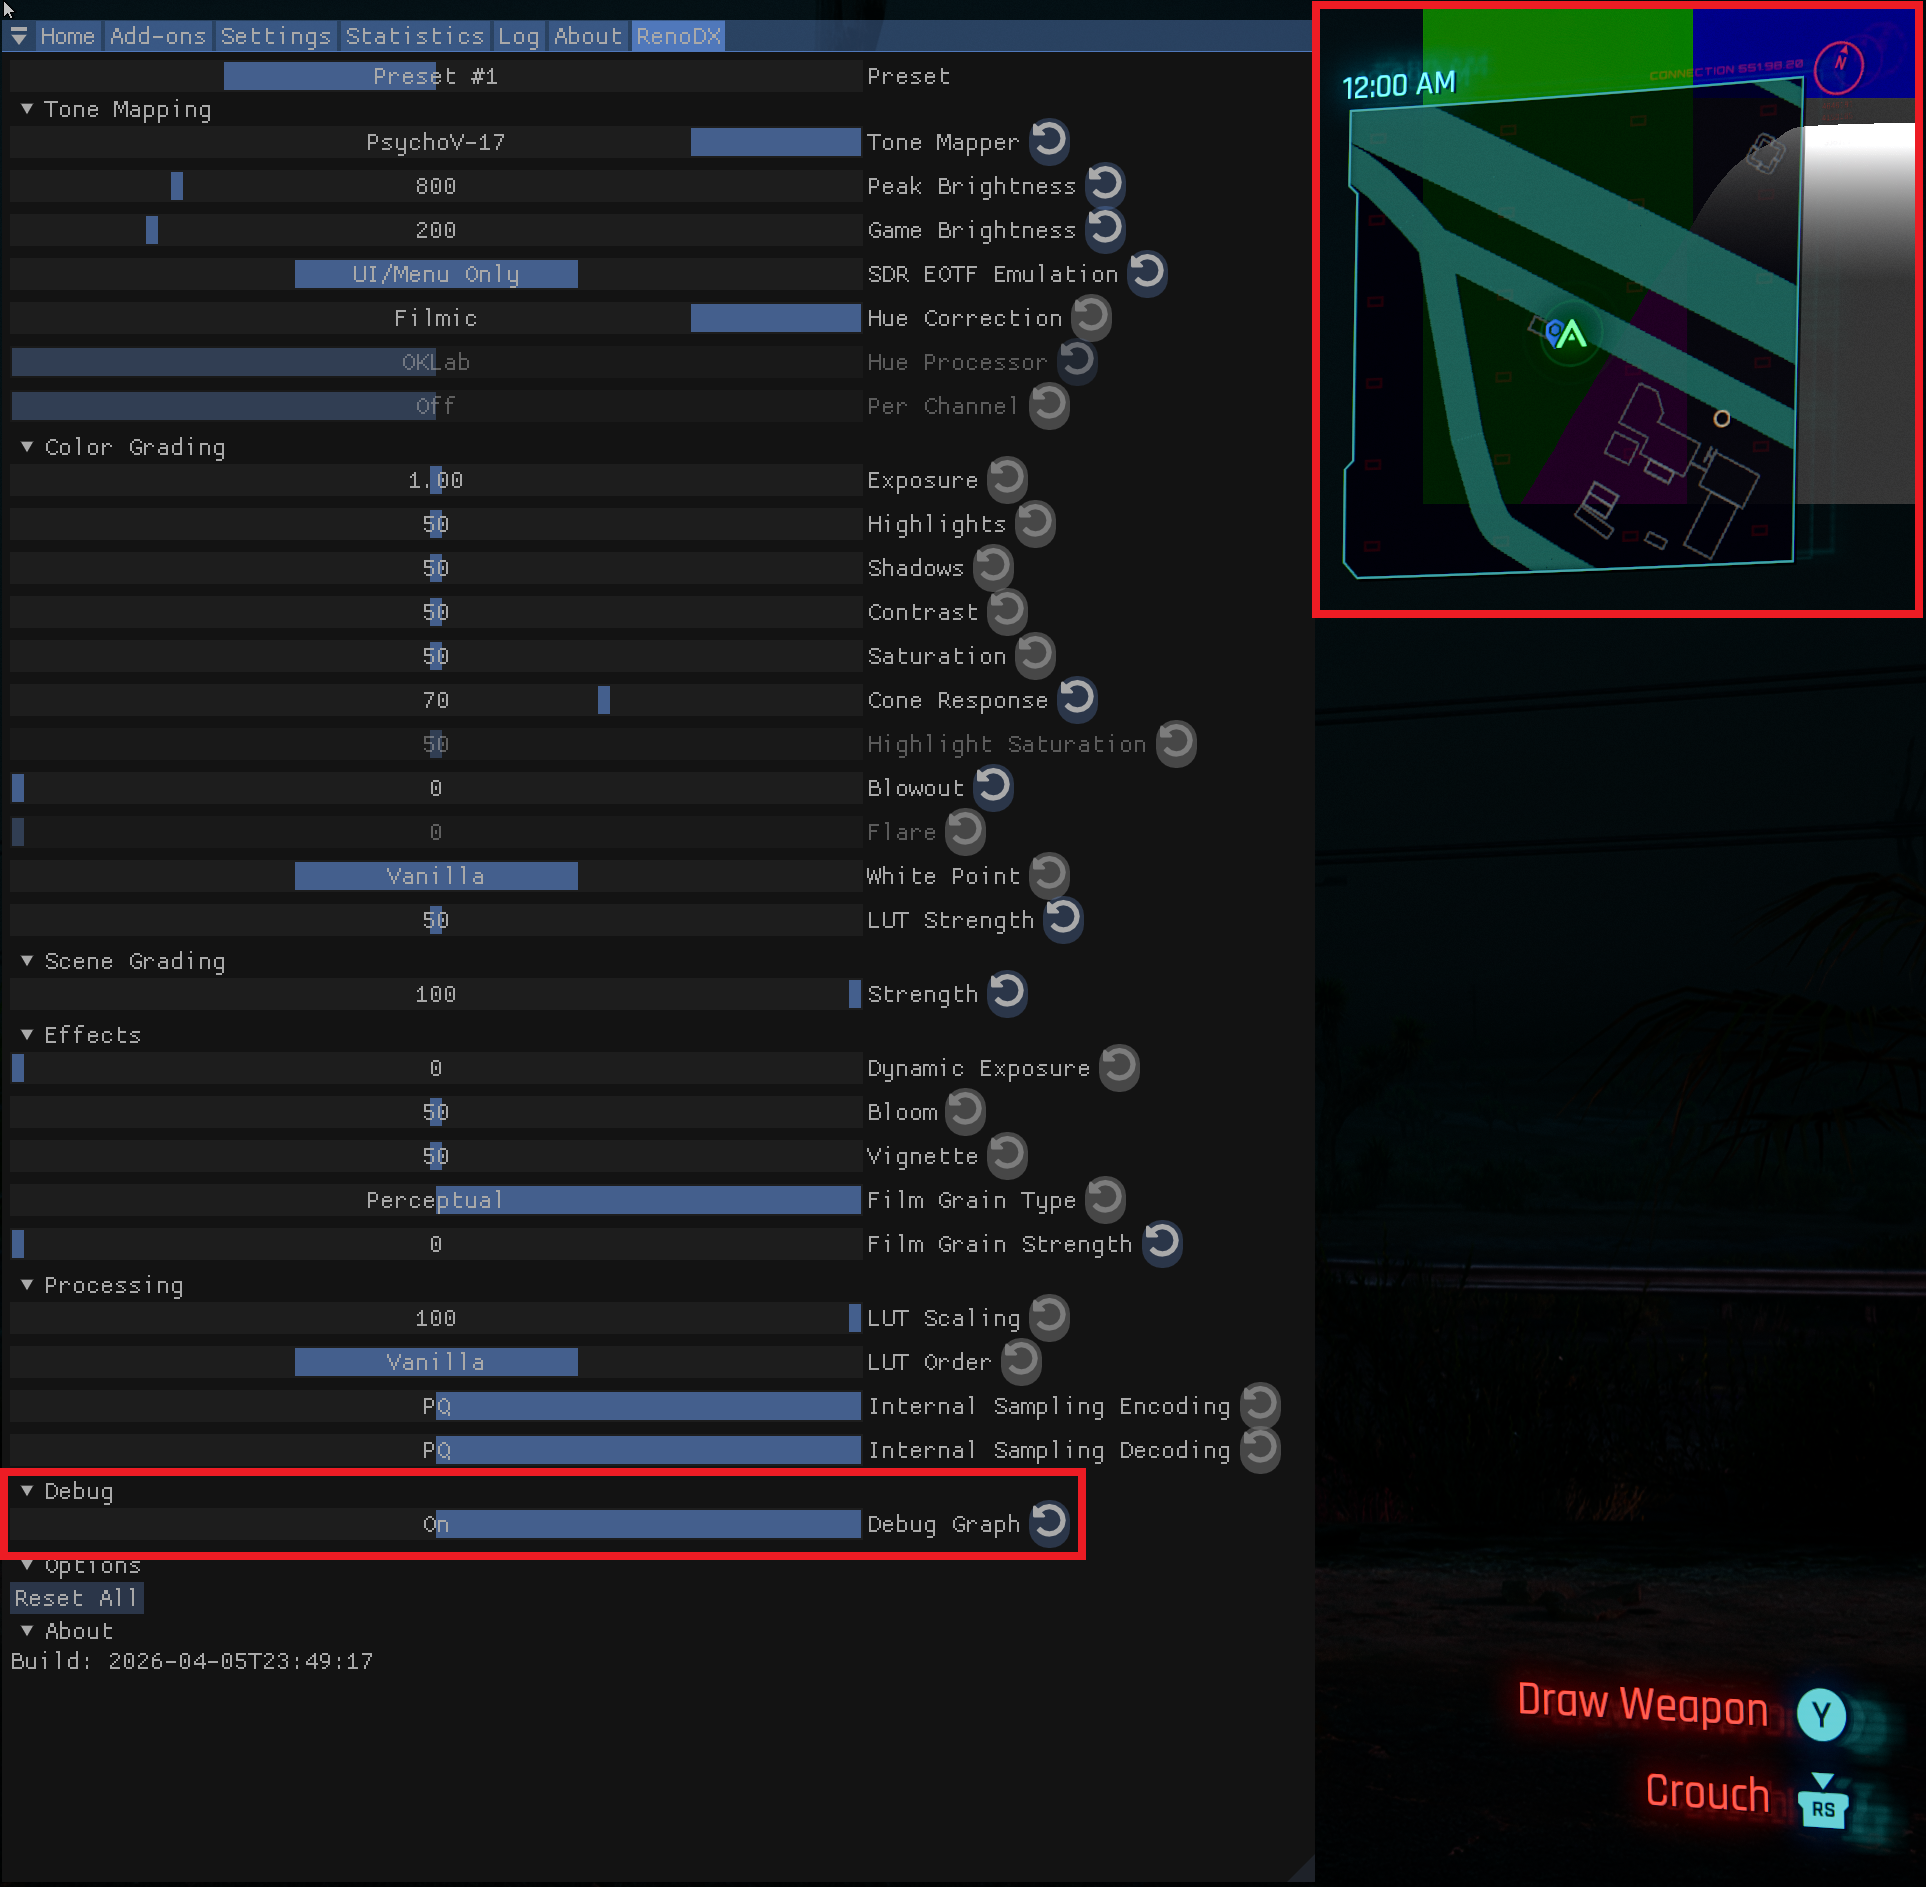
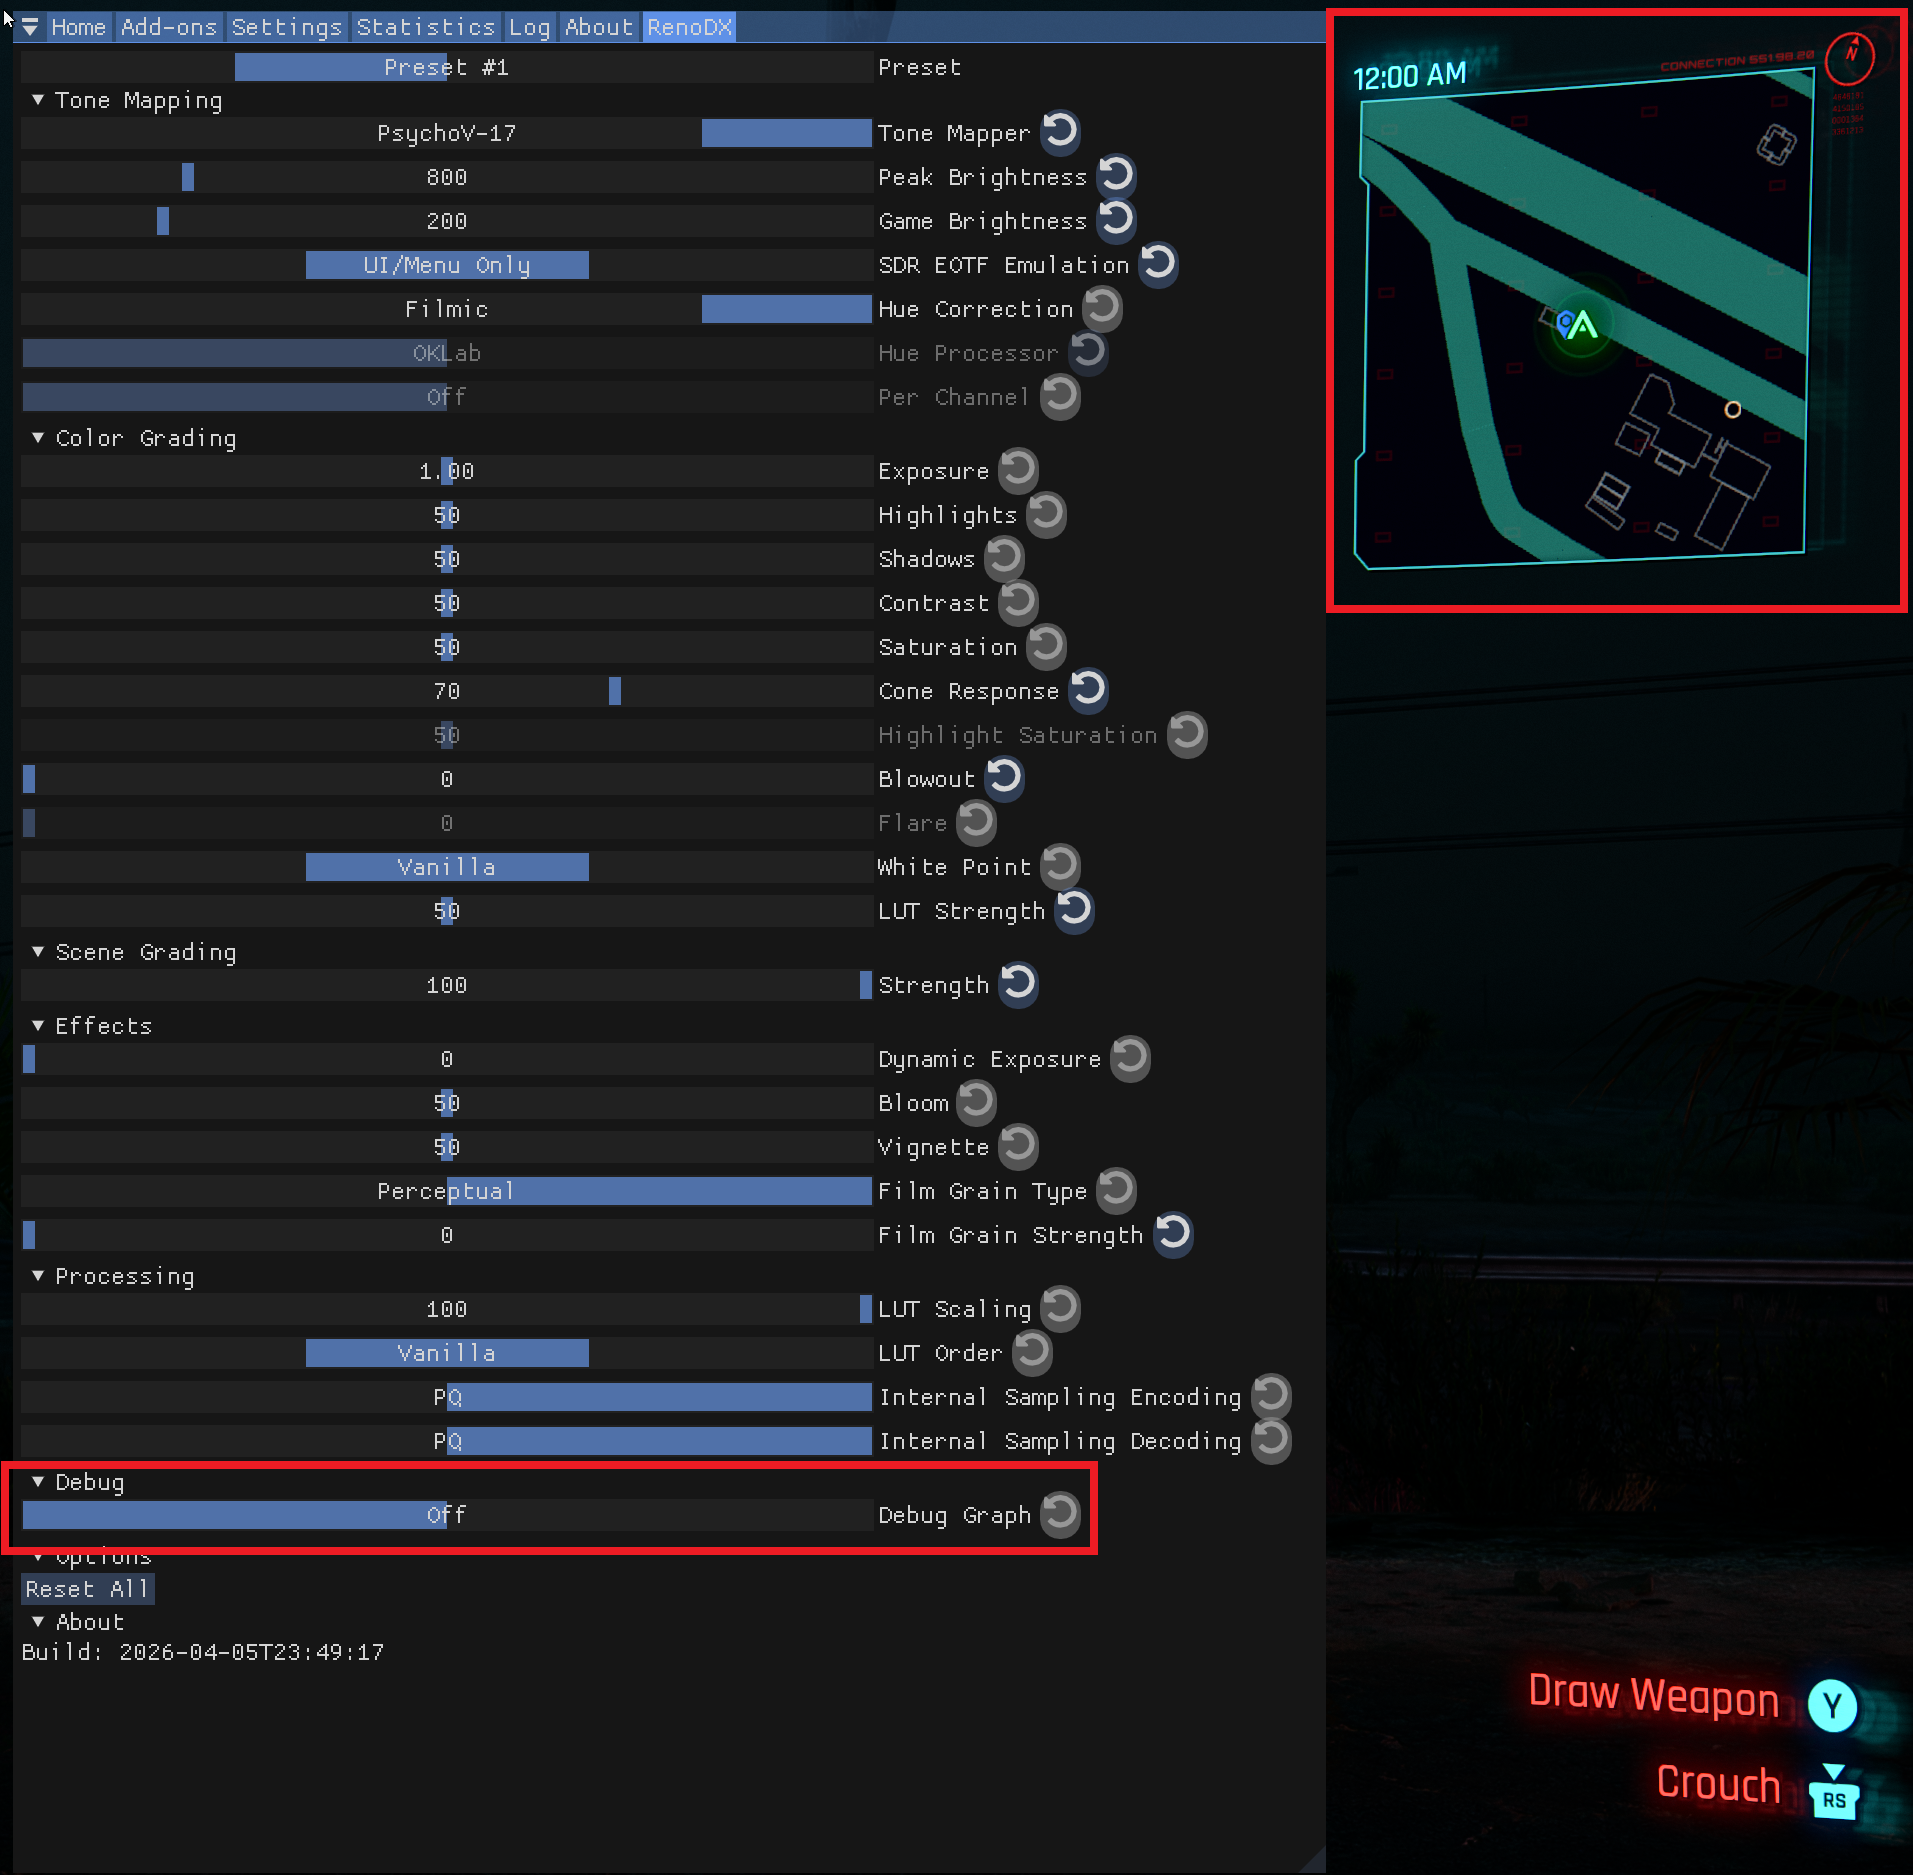
DEBUG GRAPH: SET TO OFF!!!
- Found at the very bottom of RenoDX under Debug.
- Otherwise you’ll see a colored square on the upper right corner behind the minimap.
If you do not see a Debug Graph slider, you did not correctly install a version hosted in the Discord server!
Debug Graph On
Debug Graph Off
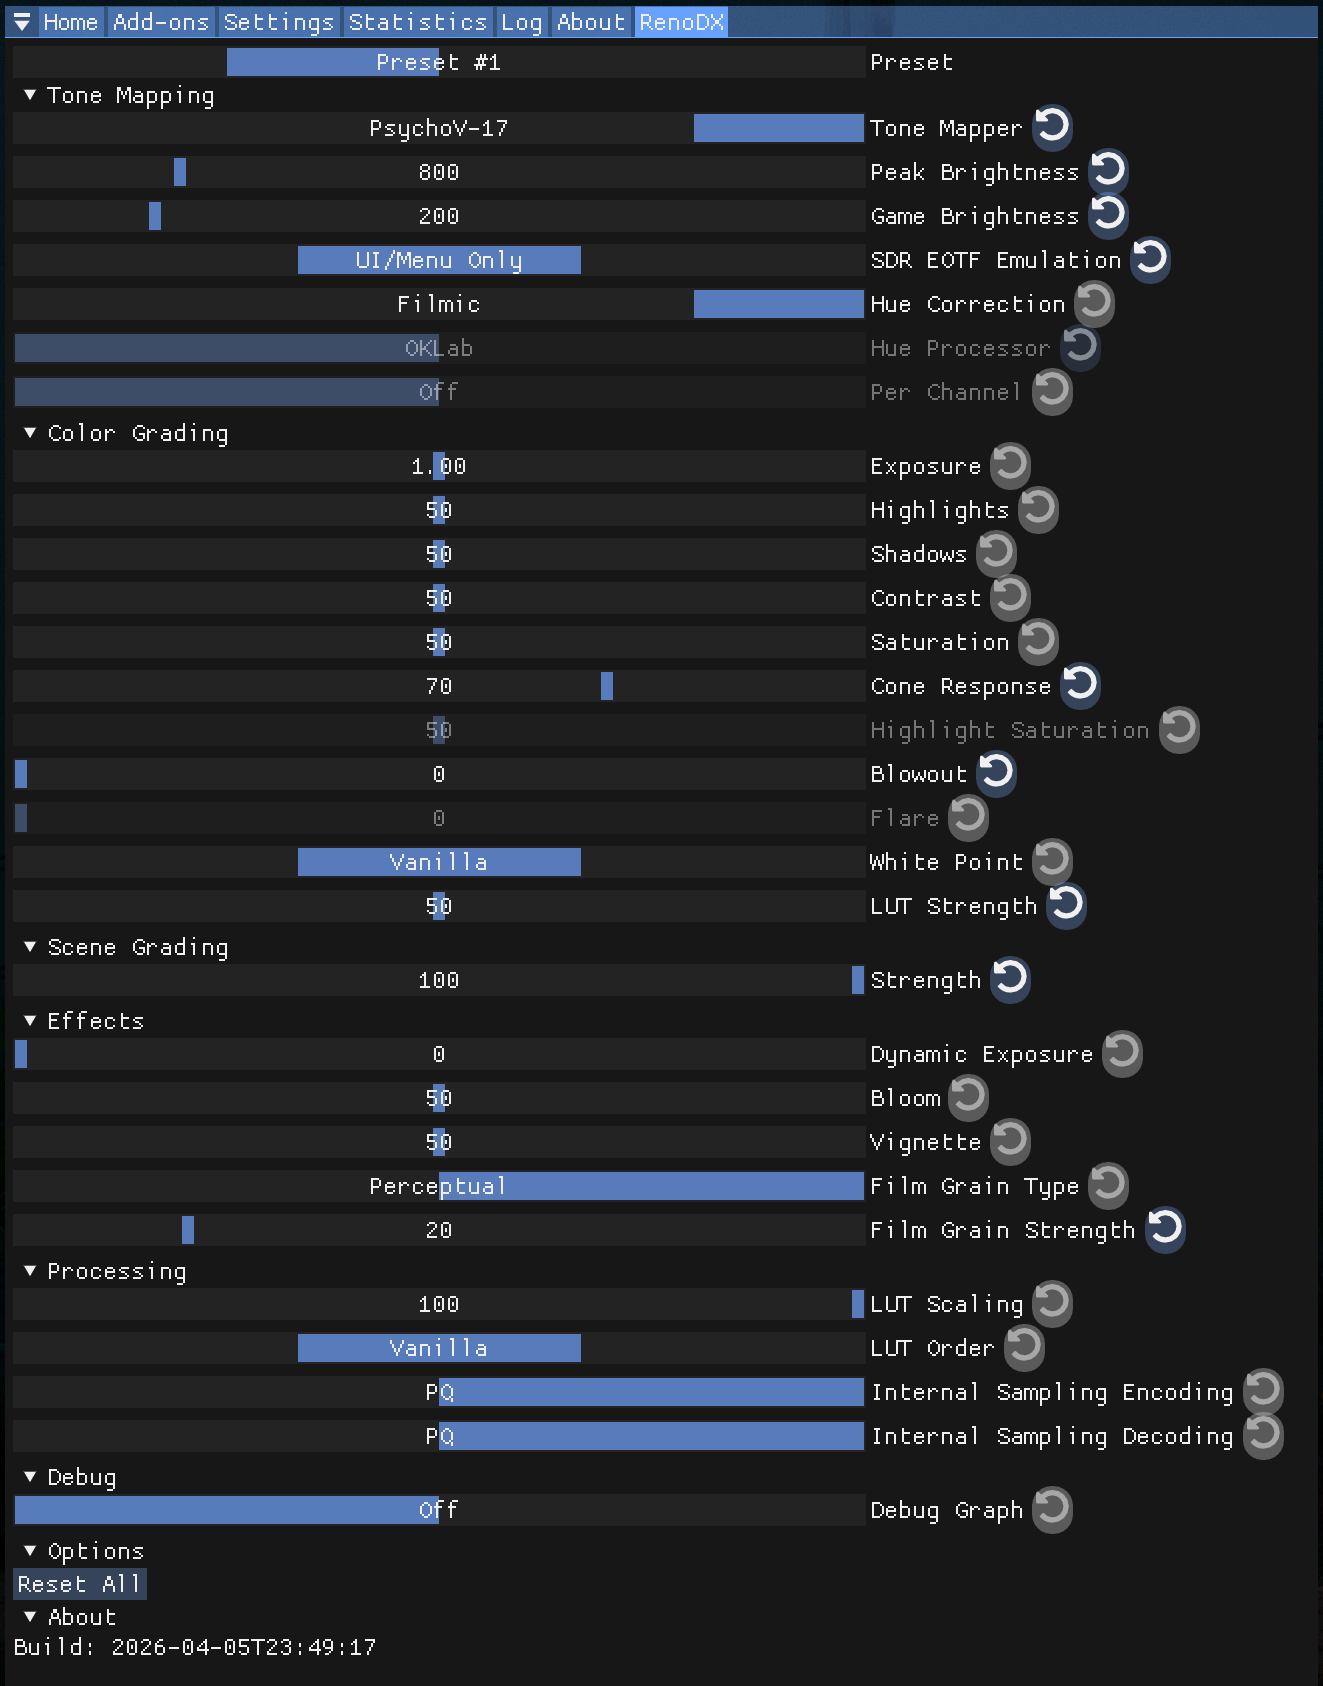
Click to see RenoDX settings
PART 3: CONFIGURING THE RESHADE PRESET
Some screenshots may still show
Creepy HDR Gameplay V2instead ofCreepy HDR Gameplay V2-1
1) Click the Settings tab within the ReShade UI.
- Under the Overlay & Styling section, I recommend enabling
Group effect files with tabs instead of a tree. When enable it will place each active shader, that has available settings to configure, into it’s own separate tab under the Home screen. If left disabled, all shaders will be listed one after the other. - Do not check the box next to
Load only enabled effects. This will remove any shaders toggled off that are a part of this preset and you will also lose the configured settings for them.
Click to see a breakdown of all the important ReShade settings

2) Click the Add-ons tab within the ReShade UI
- Make sure you see
Generic Depthlisted. Click the dropdown arrow next to it. - Where it says
Aspect ratio heuristic, click the dropdown arrow. - Change this to
Multiples of resolution. If this isn’t selected then the Deband shader, which relies on the depth buffer, won’t work correctly.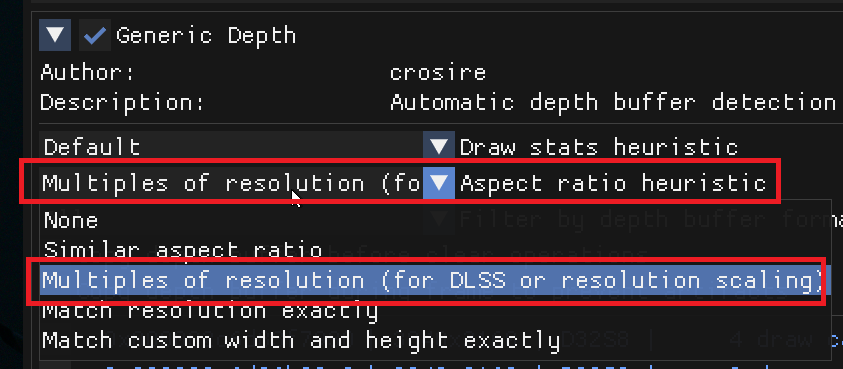
You do not need to disable the Effect Runtime Sync addon.
The RenoDX Discord will often recommend disabling both the Generic Depth and Effect Runtime Sync addons for performance reasons because people who just use RenoDX and no other shaders do not need these. While its true that some games such as Borderlands 4 can gain a few FPS from doing this, Cyberpunk 2077 is not one of those games.
When I tested this with my setup, Intel i7-12700K CPU and RTX 3090 GPU, I saw no measurable increase with either addon disabled. As mentioned above you’ll need the Generic Depth addon to properly use the Deband shader anyways. You can disable the Effect Runtime Sync addon if you want, but its definitely not necessary.
3) Click the Home tab within the ReShade UI.
- Make sure you have the Creepy HDR Gameplay V2-1 preset loaded. This should be picked by default if you picked it in the ReShade Installer.
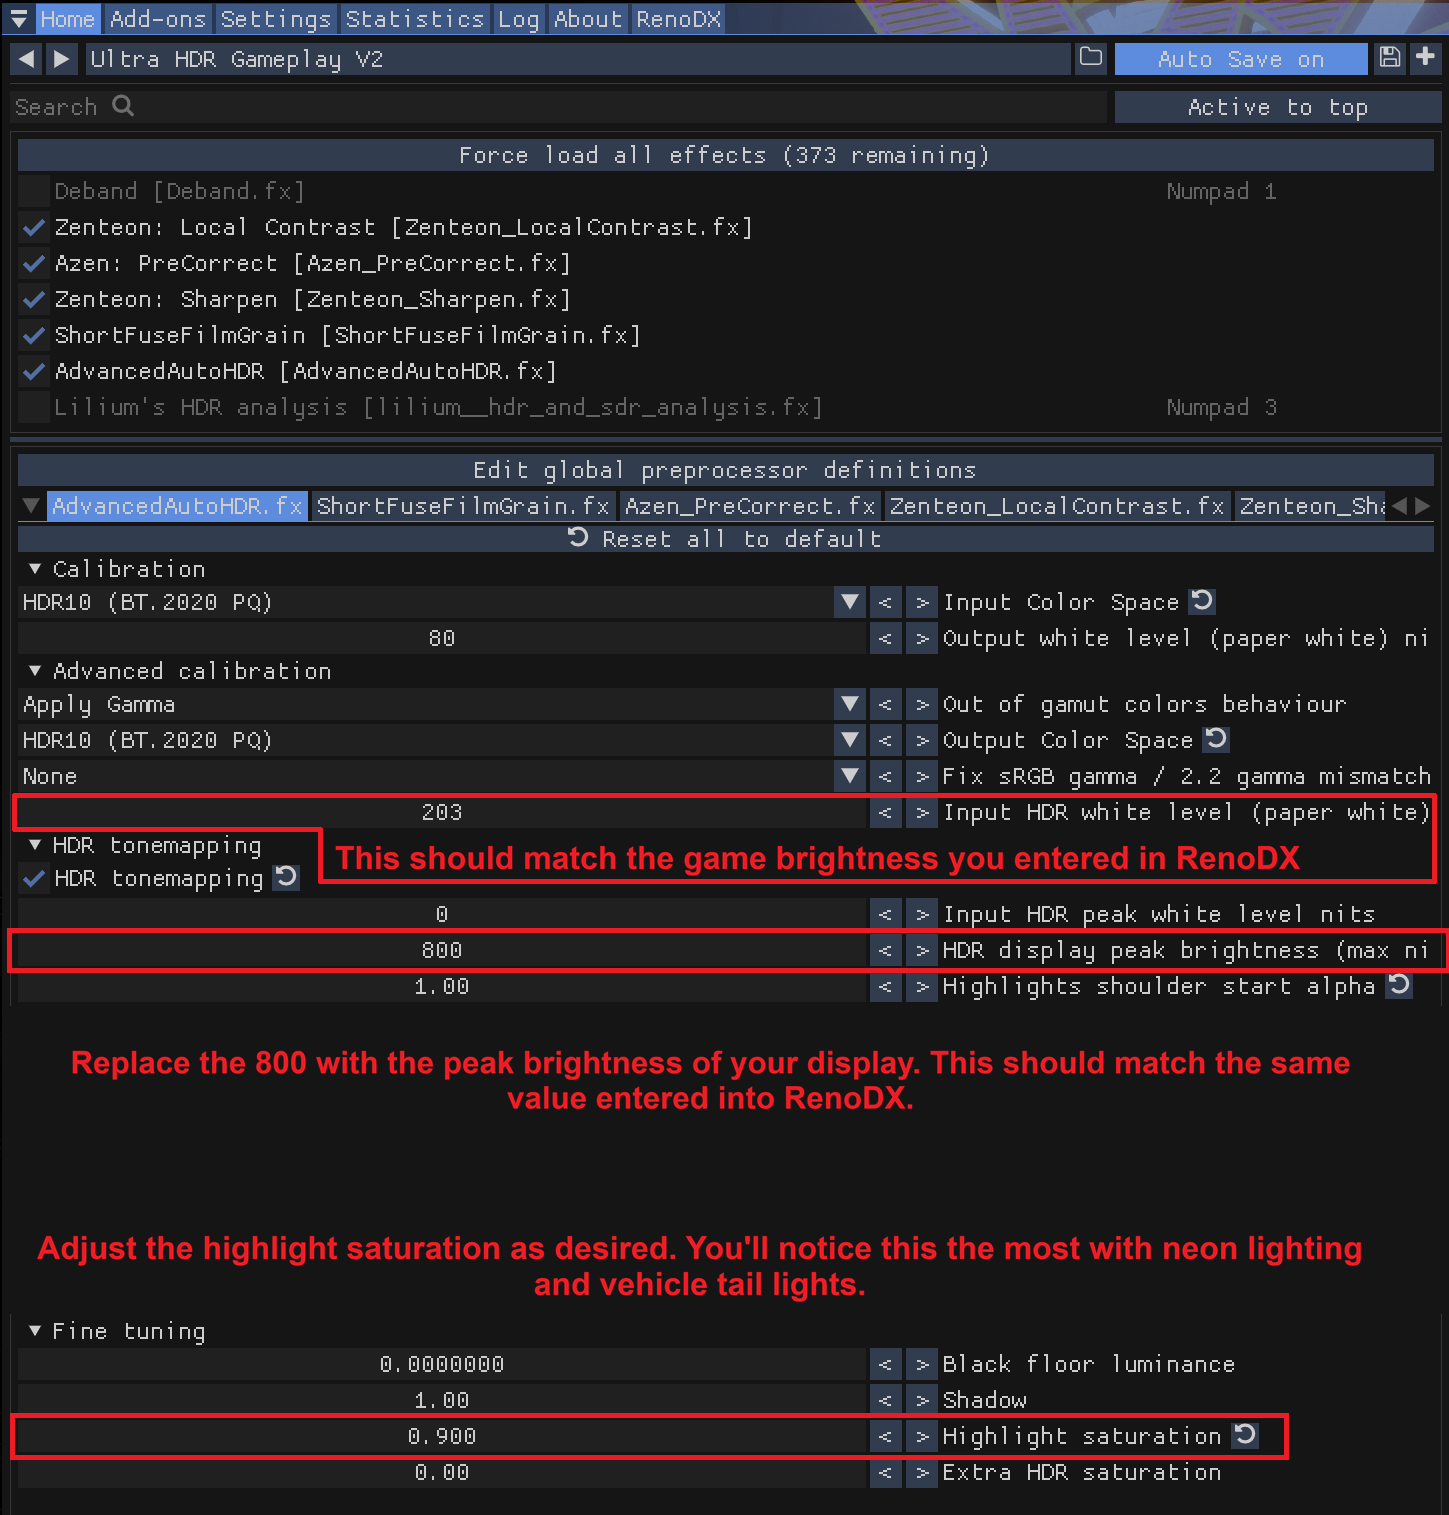
4) Within the settings for the AdvancedAutoHDR shader you need to change the following to match your setup:
- Under Advanced Calibration >
Input HDR white level (paper white): Preset will have this set to 203 by default. Change this to match the Game Brightness within RenoDX. - Under HDR tonemapping >
HDR display peak brightness (max nits): Preset will have this set at 800 by default. Change this to match the Peak Brightness within RenoDX. - Optional: under fine tuning >
Highlight saturation: I have this set at 0.900 to make the highlights look better, but you adjust this to your preference.
5) Breakdown of included shaders and how to tweak them further.
- Deband: Disabled by default. Toggle this on if using Ray Reconstruction Preset E or else you’ll see a grid pattern in the sky. Preset D probably won’t need this shader, but it’ll come at the cost of worse motion clarity which will be more noticeable when using frame generation.
- I don’t recommend touching the settings in this shader.
- Zenteon: Local Contrast: Provides a small amount of local contrast based sharpening to enhance texture detail. The default values of this are subtle as a small increase in intensity can have a large impact when used with HDR.
- Detail Precision: 0.300. Range is 0.00 to 1.00. Lower = larger areas, higher = finer details.
- Texture Detail: 0.050. Range is -1.00 to 1.00. Negative values will lower the sharpen affect while decreasing contrast. Increasing this will intensify the sharpening effect while also increasing the contrast. Be very careful adjusting this, as it can have a large impact on how intense the highlights are.
- Highlight / Shadow Detail: DO NOT TOUCH THIS. This does not work well with HDR.
- Azen: PreCorrect: This is the primary shader used within this preset. It’s designed to remove color grading from the game. This is going to be the primary shader you tweak, especially when doing virtual photography.
- Color Normalization: 0.00. Range is 0.00 to 1.00. Adjusts the color grading portion of the shader. By default this won’t be applied, but you can adjust it to you’re liking depending on the LUT you’re using.
- Contrast Normalization: 0.200. Range is -1.00 to 1.00. This is basically the Texture Detail setting from the Local Contrast shader without the additional sharpening effect (the range is even the same). This is probably the most important setting to tweak in this entire preset. This set to higher values, combined with RenoDX’s Cone Response set to 70, can provide a very nice impactful look for screenshots.
- Temperature: 6500. This is your white balance adjustment. You can mess with it if you want, however it should be noted that it was not designed with HDR in mind, so the value set here won’t be accurate. For more accurate color temperature adjustments, I recommend using ShortFuse’s Color Temperature shader. This is found in the same GitHub repository as the film grain shader you downloaded for this preset.
- The Contrast, Saturation, and Exposure settings are all better off being adjusted within RenoDX. Leave these at their default values.
- Zenteon: Sharpen: Removed as of Version 2.1 but still available in the optional toggleable version. Does what it says, sharpens edges. I personally do not use this shader much, but a lot of people wanted sharpening to be added to version 1 of the preset so here we are. I had people test this vs Lilium’s RCAS and this was the more popular option.
- Sharpening Intensity: 0.100. Range: 0.00 to 2.00. This setting is the main reason why the AdvancedAutoHDR shader was added, because as the sharpening effect increases, so does the highlight brightness (and thus increasing the possibility of highlight blowout which is when the highlight coloration doesn’t look right).
- Dehaloing Intensity: LEAVE AT 1.00. I tested this setting at lower values and the sharpening doesn’t work properly in HDR without this set to 1.00.
- AdvancedAutoHDR: Please do not disable this shader. This is needed to compensate for the fact that I’m no longer using Soop’s HDR Converters in the preset (which were removed because of how much banding they were causing). Otherwise the peak brightness will jump and highlights will look wrong.
- As mentioned in the previous step, you need to adjust the
Input HDR white level (paper white)andHDR display peak brightness (max nits)to match what was entered into RenoDX. - Highlights shoulder start alpha: I do not recommend changing this from the preset default of 1.00. Highlights will look much less impactful at lower settings.
- Highlight saturation: As mentioned in the previous step, I have this at 0.900 to make the highlights look better, but you can adjust this to your preference.
- HDR Saturation: Can be used instead of the Saturation slider within RenoDX.
- Shadow: Can be used instead of the Shadows slider within RenoDX.
- Do not adjust any other setting or uncheck / check any other boxes within this shader or else you WILL screw up the preset.
- As mentioned in the previous step, you need to adjust the
- Lilium’s HDR Robust Contrast Adaptive Sharpening (RCAS): Replaced Zenteon’s Sharpening as of Version 2.1.
- RCAS Mode: Luminance. Adjusts the sharpening mode. Luminance is the newest mode and the most subtle of the sharpening modes. The other modes can look nice, but the effect will be much more intense on any edges and UI elements.
- Sharpness Amount: 1.000. Range 0.000 to 1.000. On Luminance mode this can be set to 1.000 without having it look too sharp. With the other modes you’ll probably want to turn this down to like 0.500 or below.
- ShortFuseFilmGrain: This is the same perceptual film grain present within RenoDX, so you want to make sure RenoDX’s film grain is set to 0. Film grain is crucial to hiding / fixing banding issues, so having even a little bit can make a difference.
- Strength: 20. Adjusts the film grain intensity. The default value is pretty low so you can increase it as desired. Just be aware that this is an animated filmgrain so higher values make this more obvious.
- Diffuse White Nits: 203. This should roughly match the Game Brightness value within RenoDX or you can just leave it at the default setting.
- Lilium’s HDR Analysis: Disabled by default. This shader is not used for gameplay. I have included it because every single person who is into HDR needs to get comfortable using it. You do not need to adjust any setting within this shader for it to work.
- The main number number you’ll want to look at is the max nits. Do not be alarmed if this is slightly over your peak brightness. It is normal for this to be within 10-50 nits of what you set in RenoDX and the AdvancedAutoHDR shader.
- You can also use the cursor nits, to get an accurate reading of what the mouse cursor is currently on.
- Feel free to move the shader around the shader order to see how each shader affects the maximum number of nits currently on screen. Lilium’s HDR Analysis can only see the combined effects of any shaders placed above it. Anything placed after it will not show up in the listed stats.
- COMMON MISCONCEPTION: THE MINIMUM NITS DOES NOT NEED TO BE ZERO!!! You will almost never see a pure 0.00 listed as the minimum unless you’re in a perfectly pitch black area. Do not obsess over this value.
CONFIGURATION OF RENODX AND THE RESHADE PRESET IS COMPLETE!!!
Troubleshooting RenoDX Issues
Washed out / gray image
- Make sure RTXHDR is turned off globally (or at least for Cyberpunk 2077)
- Verify HDR is turn on in Windows and in Cyberpunk 2077.
- Make sure Color Precision is set to High within the graphics settings. RenoDX will not work with this set to medium.
- Make sure you’re using the latest add-on version of ReShade.
Crushed Black Levels / Shadows Appear Darker Than They Should
- Disable HDR10+ Gaming within the in-game video settings. This will only appear if your computer detects that you are using an HDR10+ capable display.
HDR10+ Setting Location

- Is the Tone-Mapping Midpoint, within the in-game HDR settings, set at something lower than 1.0?
- Some LUTs can cause this issue, especially if the RenoDX settings are not configured to compensate for it. See if the problem goes away by selecting the vanilla LUT with RenoDX at the default settings (but leave Peak Brightness the same).
- Disable any ReShade shaders if you’re using them, especially if in HDR10 scRGB mode.
- Are you using Nova City 2? This can cause the game to appear darker in some areas, especially in interior spaces and at night. This is expected behavior of the mod as it recommends using flashlight and night vision mods with it.
Colored Square Behind Minimap / Upper Right Corner
- This is the debug graph from the WIP RenoDX. Look at the very bottom of the RenoDX settings, under Debug turn off Debug Graph
Debug Graph Off

Banding / Grid Pattern in the Sky
- Make sure you’re using Ray Reconstruction preset D. Easiest way is to use the Nvidia App or a third party program such as DLSS Swapper: https://github.com/beeradmoore/dlss-swapper/releases
- When using Ray Reconstruction it overrides the SR model completely, meaning presets K, L, M, etc. won’t get applied when using RR.
Ray Reconstruction Preset D vs E:

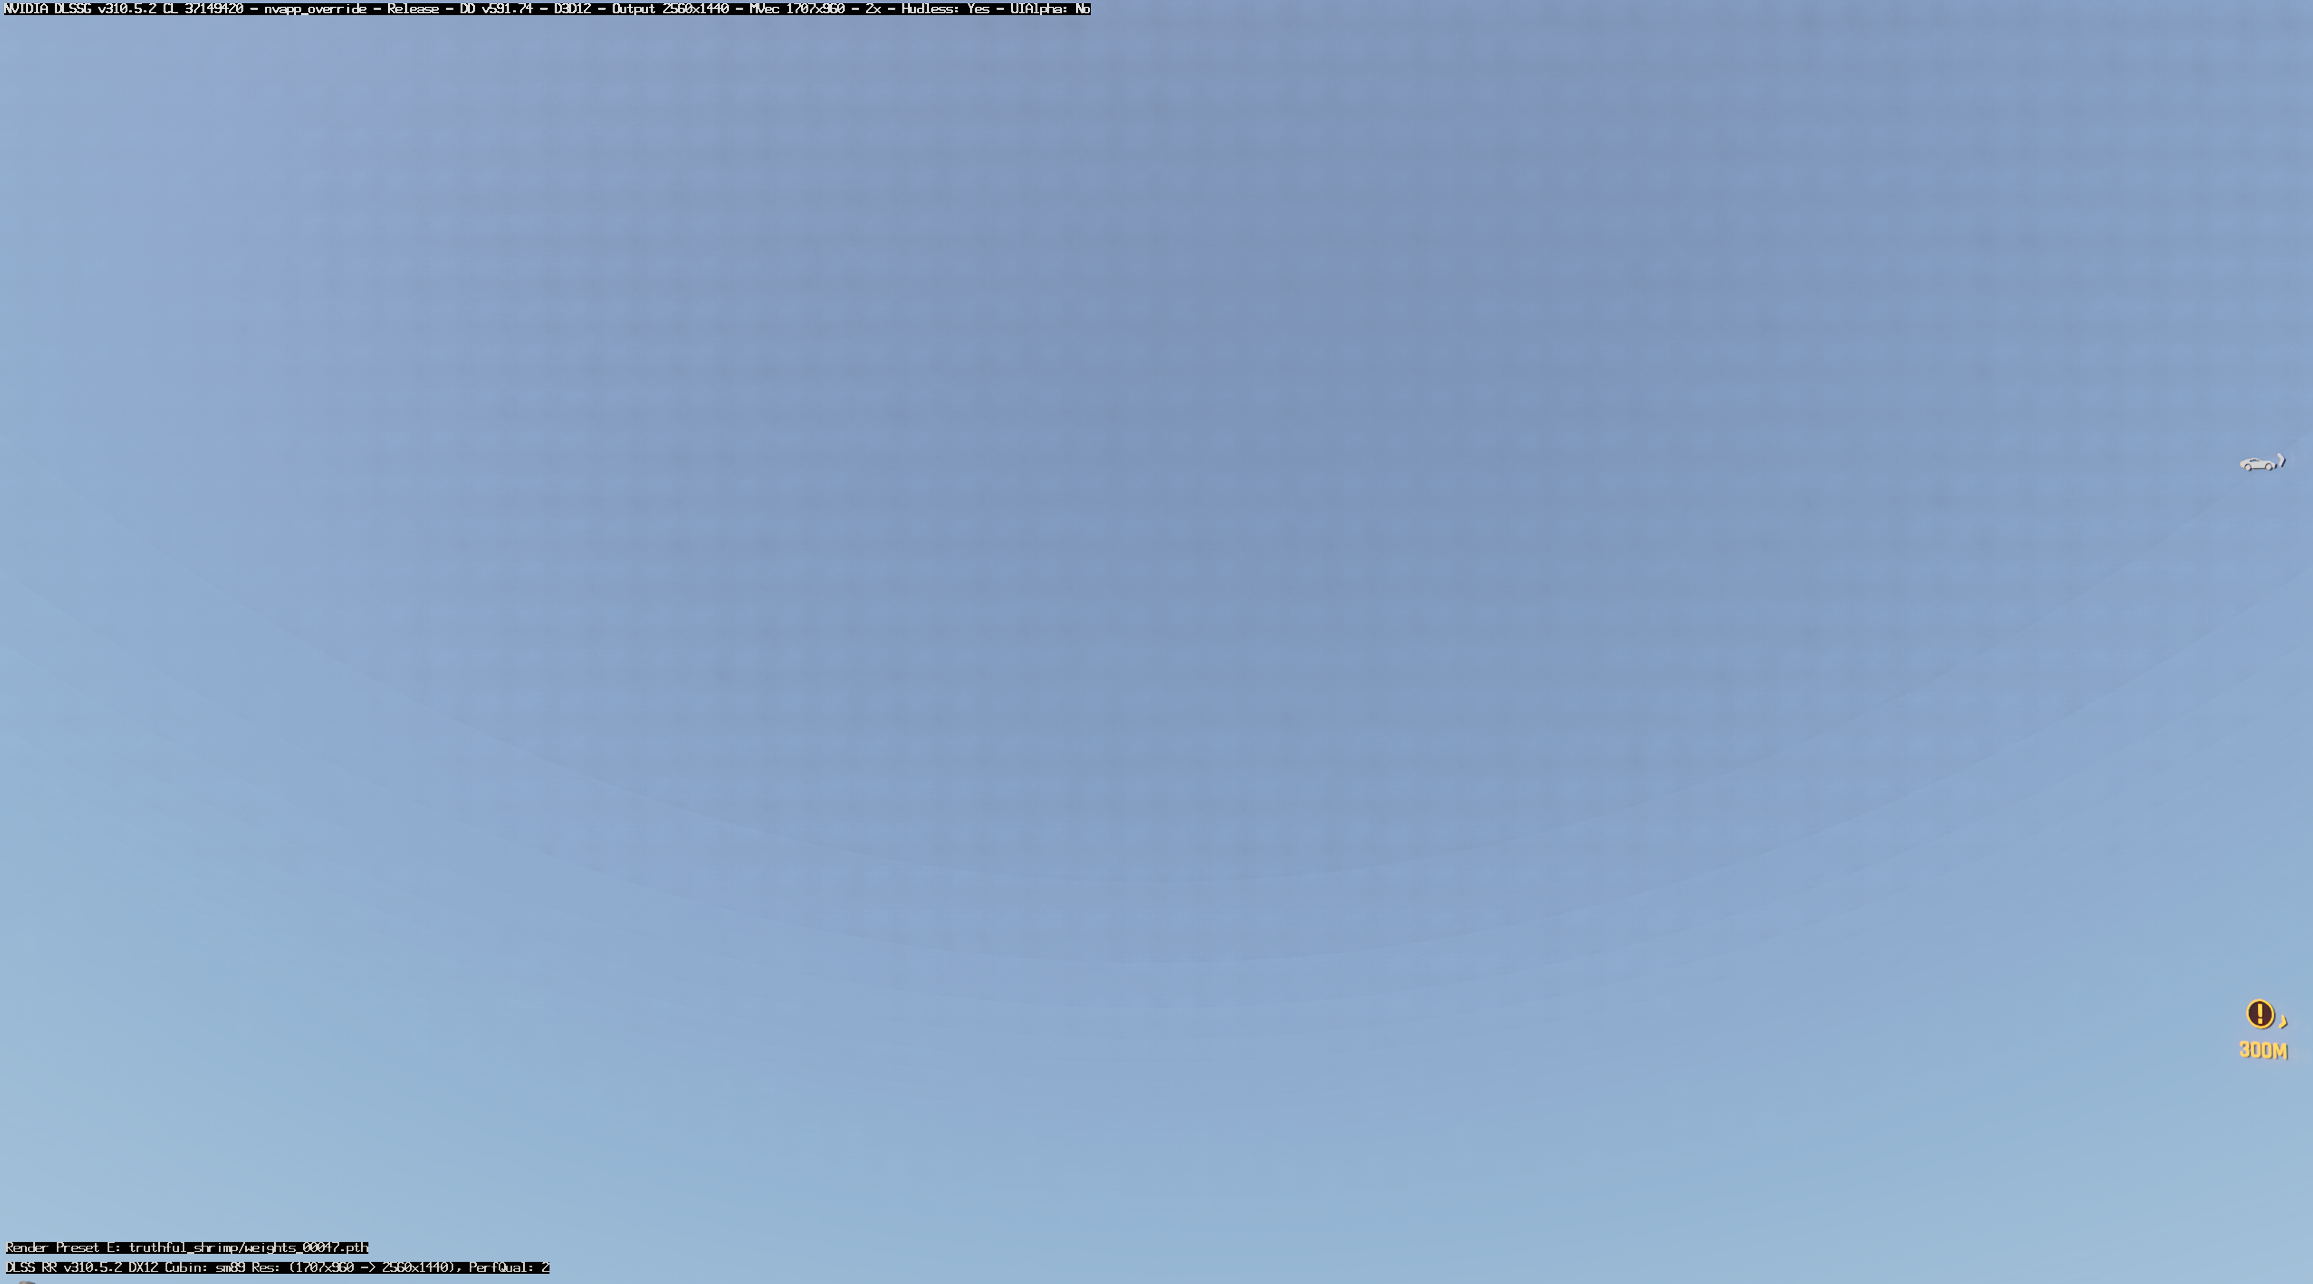
- Credit to squarto and Gn3xus for figuring this out and taking these comparison images.
Frame Generation artifacts when moving
Especially in light sources
Make sure HDR10 PQ Saturation is set to 0 in the base game / vanilla HDR settings.
Before and After Changing HDR10 PQ Saturation:
Credit to Invictus for figuring out this issue and supplying the video showing the fix!
Map is hard to read
RenoDX Map Bug

Known issue with this version of RenoDX (and the WIP version before it). This bug affects the vanilla map and every map mod.
- Cyanide has kindly made a MapLUTBegone mod that will help fix the issue. It’s pinned in the Cyberpunk channel of the RenoDX server. Direct link to post: https://discord.com/channels/1408098019194310818/1434377434022809610/1492718360163647642.
- HUD Painter can change the contrast, saturation, and colors of the World Map: https://www.nexusmods.com/cyberpunk2077/mods/14935
- Color options do not work on the realistic map mod
- HUD Painter does require most of the core mods such as redscript and codeware, but if you have a full modlist then you’ll probably have these anyways. Make sure to install the mod settings optional mod so you can see the World Map options.
- Can be used in combination with the MapLUTBegone fix or on its own.
MOD Settings HUD Painter
Settings listed only for reference, please adjust to your liking.
- Some people also find that the Realistic Map Mod looks better. Pick the 8K version or higher, as the lower resolution versions have issues: https://www.nexusmods.com/cyberpunk2077/mods/17811
How do I adjust the UI brightness?
You can change the UI brightness by adjusting the paper white value in the game’s HDR settings. This value has no other effect when RenoDX is installed.
HUD / UI Looks Weird
- This usually appears as boxes or borders around parts of the HUD.
- The vanilla film grain is broken and can cause this issue. Make sure film grain type within RenoDX is set to
Perceptual.
How to Provide More Info for Troubleshooting
1) Make sure view file name extensions is enabled within Windows File Viewer. This will allow you to see the commonly used file types such as .ini, .txt, .log, and .exe.
How to view file name extensions in Windows 11:
- 1) Open File Explorer.
- 2) Along the top bar of File Explorer, left click View.
- 3) Hover over Show, then make sure File name extensions is checked.
2) Take screenshots of the issue with ReShade! This will take HDR PNGs that can be uploaded to Discord. You’re also using ReShade to inject RenoDX anyways so there’s little to no reason to use another option.
- The only other accurate alternative is SKIV.
- Special K can technically work as well, but like I said in the beginning of this guide, this option isn’t supported due to issues Special K can have with RenoDX. If you need to use Special K, just use the Display Commander addon instead. It has most of the same features as Special K but is more compatible with RenoDX because it loads as a ReShade addon.
- Nvidia overlay isn’t always accurate, and it takes JXR screenshots which need to be converted to HDR PNG with another program such as SKIV.
- Windows Gamebar can suffer from accuracy issues as well.
- The Windows snipping tool, and similar apps such as ShareX, are not capable of taking HDR screenshots at all. The most they can do is tonemap an HDR image to SDR, which is equally as useless for troubleshooting.
- Please do not take pictures of your monitor/TV with your phone unless we’re troubleshooting an issue with the display itself. This prevents us from separating the issues that are present in the game, and which are just artifacts from the phone’s camera sensor.
3) Common troubleshooting questions:
- What version of ReShade are you using?
Can be found at the very top of the ReShade About tab:

- Are you using any other ReShade shaders? (checkmarks enabled in the ReShade Home tab)?
- Is HDR turned on within Windows and in Cyberpunk 2077?
- What RenoDX settings are you using? (just take a screenshot to show this)
4) Log file locations: Unless otherwise noted, all file paths are assumed to start within the Cyberpunk 2077 game folder
- ReShade.log -
\bin\x64- By far the most important log for RenoDX issues
====OTHER MOD LOGS====
If you’re using MO2, you will find most of these logs within the overwrite folder.
- Cyberpunk 2077 Crash Dump -
%LocalAppData%\REDEngine\ReportQueuefor the main game crash log - Cyber Engine Tweaks -
\bin\x64\plugins\cyber_engine_tweaks - Redscript -
\r6\logs - Red4Ext -
\red4ext\logsand\red4ext\pluginsfor specific mod logs - Ultra Plus -
\bin\x64\plugins\cyber_engine_tweaks\mods\UltraPlus
Highly recommend that you use RenoDX alongside the Ultra Plus mod! Provides some performance tweaks and also adds new visual modes for both lower end and higher end hardware configurations.
Link to Ultra Plus mod page: https://www.nexusmods.com/cyberpunk2077/mods/10490